

Monday, February 20, 2012
Giveaway Monday...Go Check it OUT
My ETSY Shop has donated a gift certificate to a fellow blogger. You can check out her blog to enter!!!

Thursday, February 16, 2012
Finish It Up Friday (a little early)
It's been crazy busy around here, I haven't been able to post in over a week. But I have been able to sew since my new machine parts came in. I have orders galore, but I have finished the top to my new butterfly quilt. My inspiration I found here, but had the new Joel Dewberry Aviary fabric in lilac and wanted to do something in purples. I don't think there are enough purple things out there!

So here is the top of the quilt, waiting on a back, and I had some scraps left so I made a cute little throw pillow too!

My second finish actually got finished. It was inspired by one I saw on the Cluck Cluck Sew blog here. I have lots of scraps from my Joel Dewberry Heirloom quilt. So I used those as my leaves, I think it came out pretty!

Thanks for stopping by, hope yall have a great weekend!!!
Linked up with crazy mom quilts finish it up Friday
Monday, February 6, 2012
WIP Pile... On Hold due to Mr. Naughty
Well the wedding was wonderful and the bride was beautiful! Now it's back to quilting...kinda! Below are two more I have in my work in progress pile... But progress has been haulted by a little 16 month old monster. That little monster came in my room and hid my presserfoot! AGAIN!!! Yep this is the second time he has made it disapear, and the second time work has been haulted waiting for the new one to come in the mail. Ahhhhh! Oh well, will have to work on other projects for now.
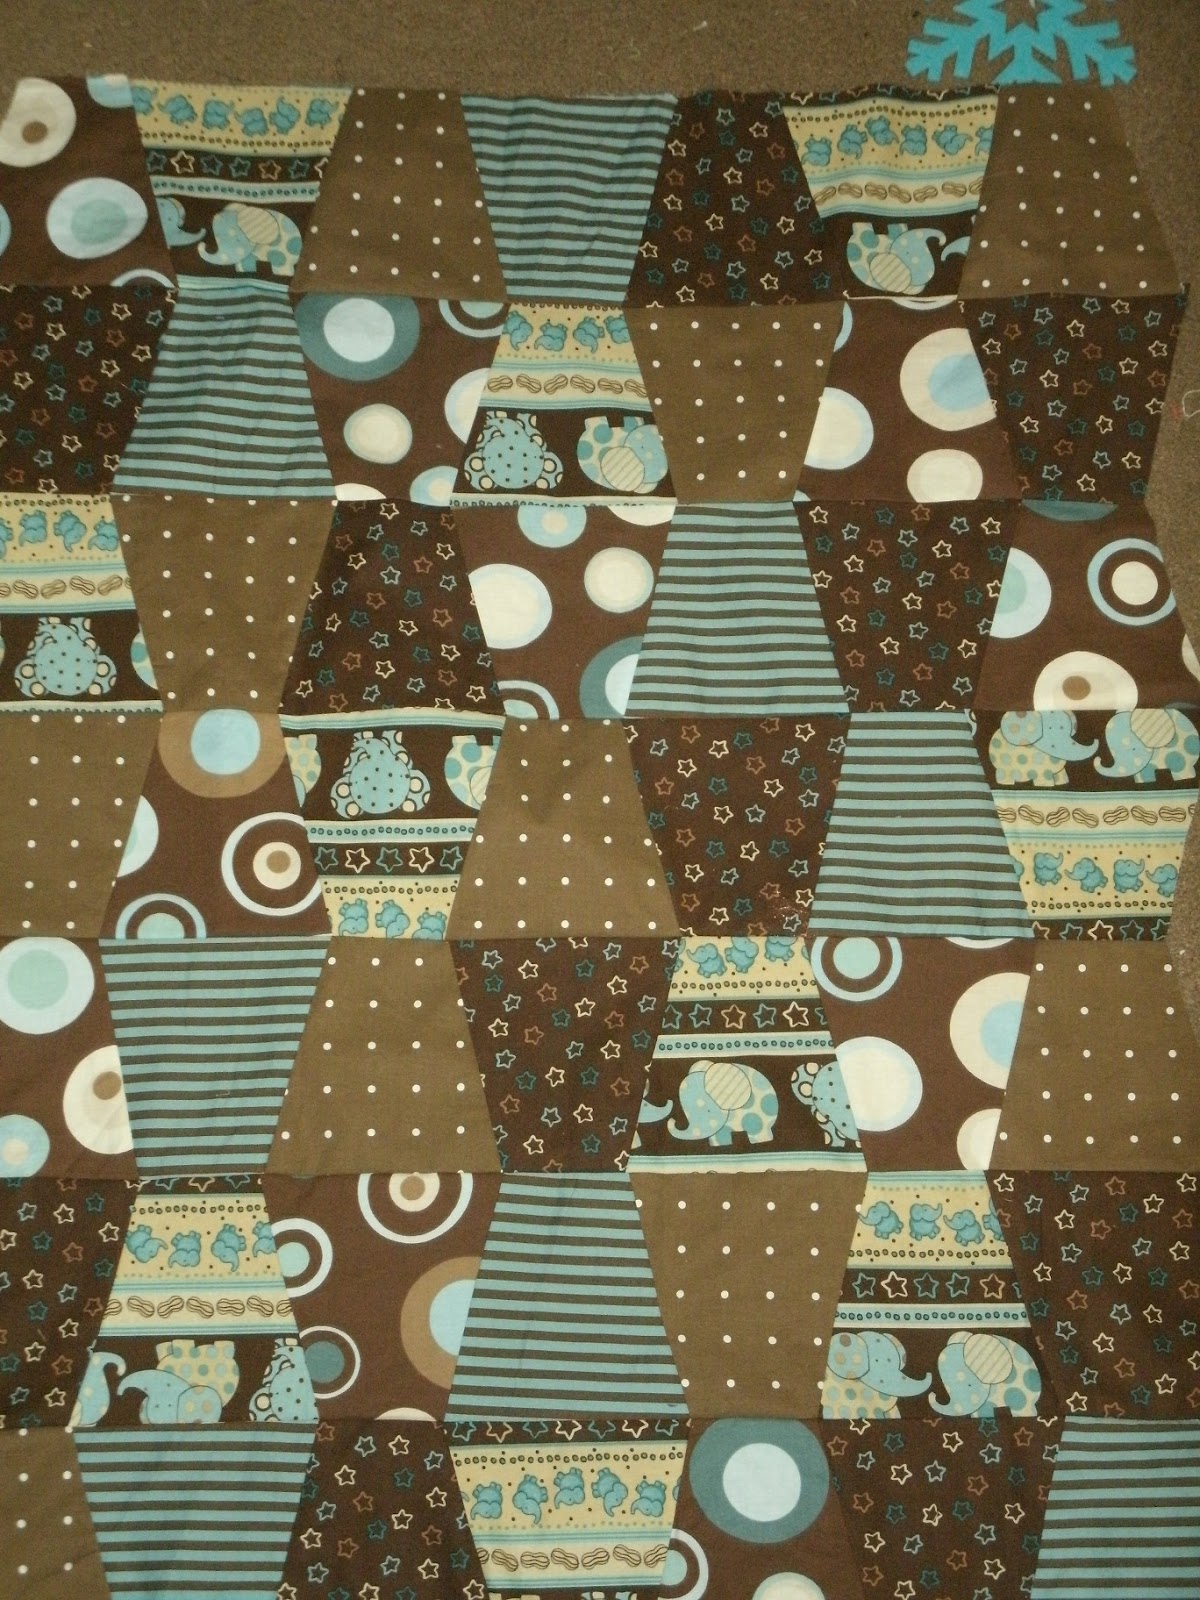
Above is my first shot at the tumbler quilt pattern. It's coming out pretty cute.
Below is that Mr. Naughty's new cowboy bedding... it's coming along too...

And one bad baby....

Happy Monday!!!
Tuesday, January 31, 2012
Two Cute Pillows
Still trying to get everything done by Saturday for my sister in laws wedding presents. I finally completed two cute pillows last night.
The fist one is a ruffle pillow, this is my first ruffle pillow I ever made and
I think it came out pretty cute.
What do you think?

The second is a small throw pillow for their bed (they are doing the master in leopard). I got this idea from Maureen Cracknell Handmade blog for a quilted heart pillow.

I hope she likes them!
Monday, January 30, 2012
Weekend Redo - Old Chair Becomes New
I have taken the first step towards getting my craft area together. I
have seen several posts of old chair finds from area Goodwill stores that have been redone so cute.
Then I got to thinking, ' I have some old chairs out in the top floor of
the barn' and what to you know they worked out perfect for a redo.
BEFORE

AFTER

I think it came out pretty darn cute and didn't cost me a dime since I already had the paint, chair and fabric. Hmmmm I have three more of these chairs in the barn, wonder who else needs a chair redone???
Next is the desk challenge. Yep there's a desk in the barn too, a big ugly bulky one that would be perfect for my sewing machine.
I am up for that challenge!!!
Happy Monday!!!!!
Friday, January 27, 2012
Fun to do Friday
If you read my last tutorial you know my sister in-law is getting
married and I was wanting to make some things that match their decor
they registered for their first place. The last tutorial was personalized wall art , today I am going to show you how to dress up a boring light switch cover to add a little pop to any room.

Supplies:
- switch plate
- fabric of your choice
- paint brush
- glue or mod podge
- sealer

First you will spread the glue on the front of your switch plate and turn on over and press in the center of the wrong side of the fabric ( I am using a bandana and the print is on both sides)
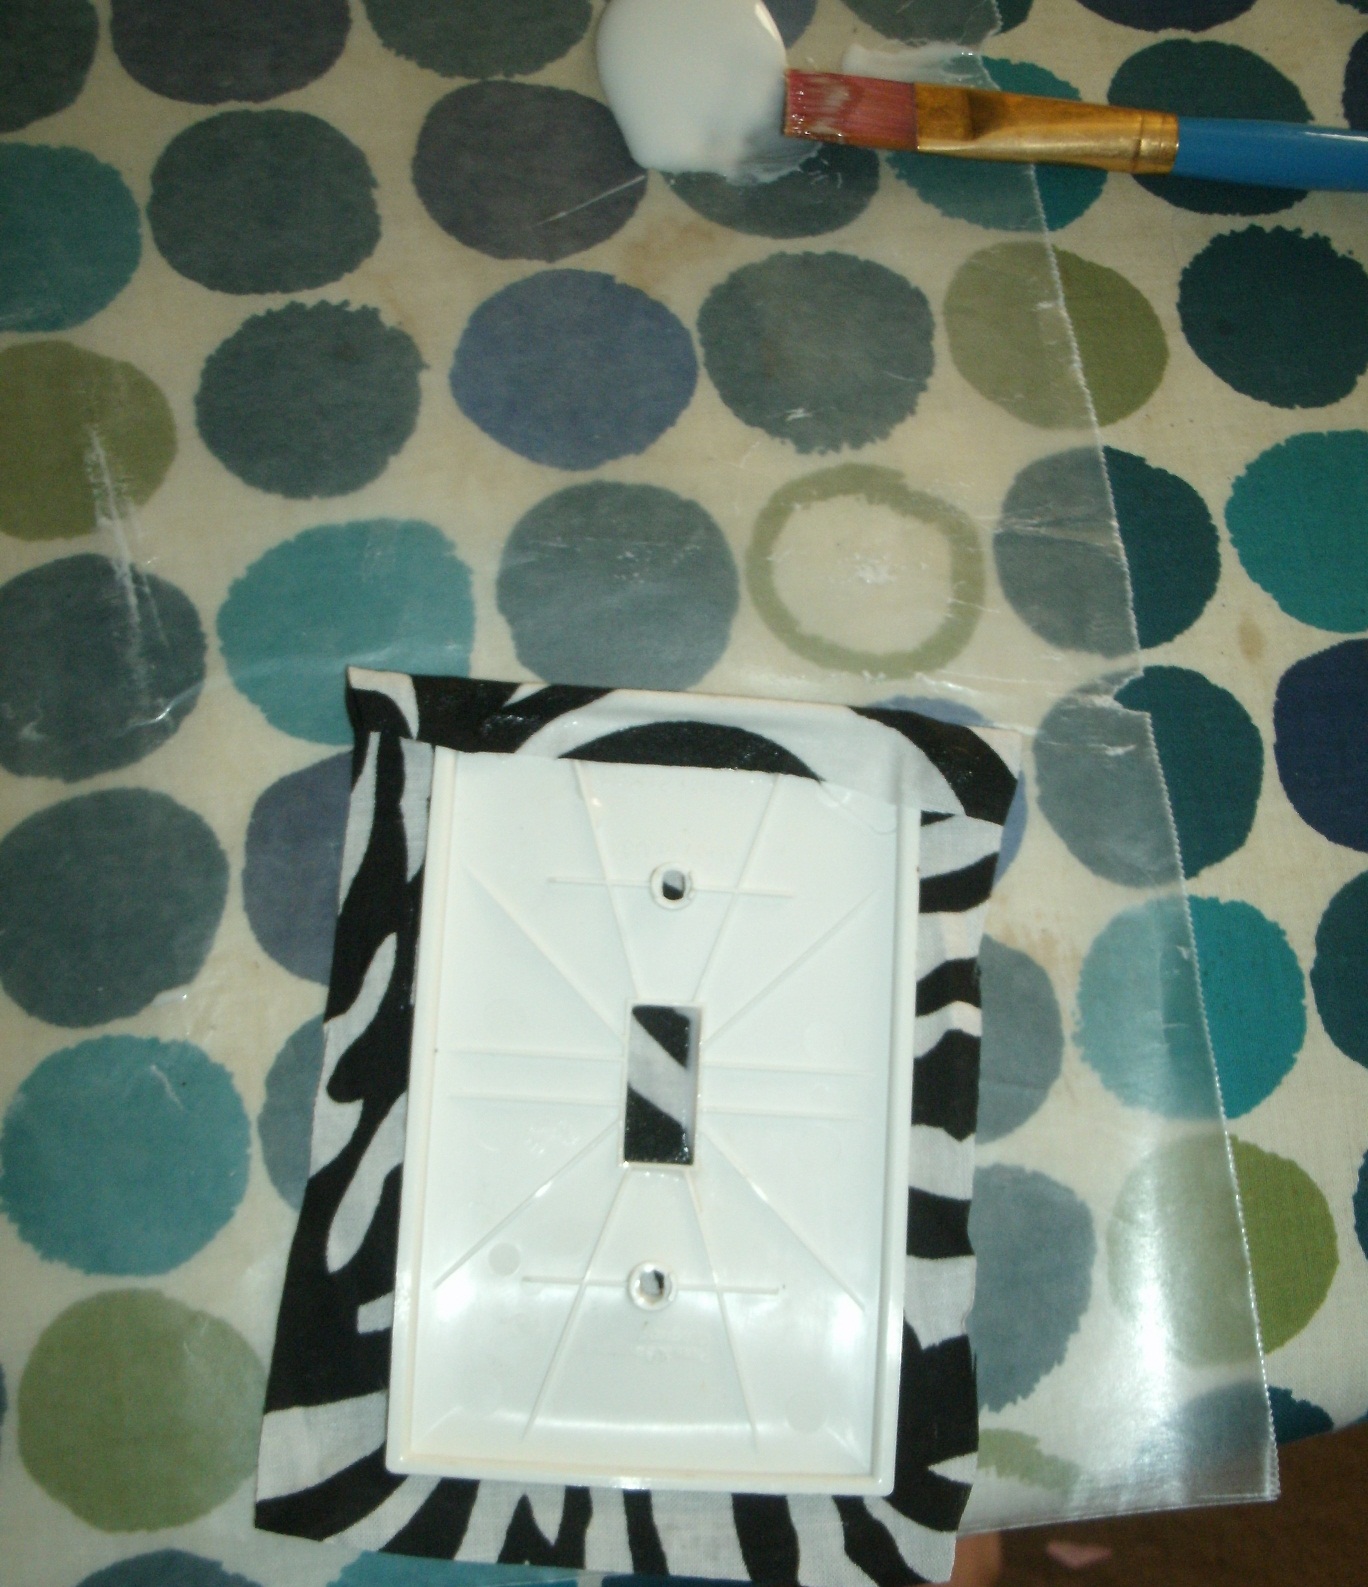
Second you will brush glue along one side of the plate and fold your fabric over.

Continue this step for all four sides, applying more glue if needed to keep edges down.
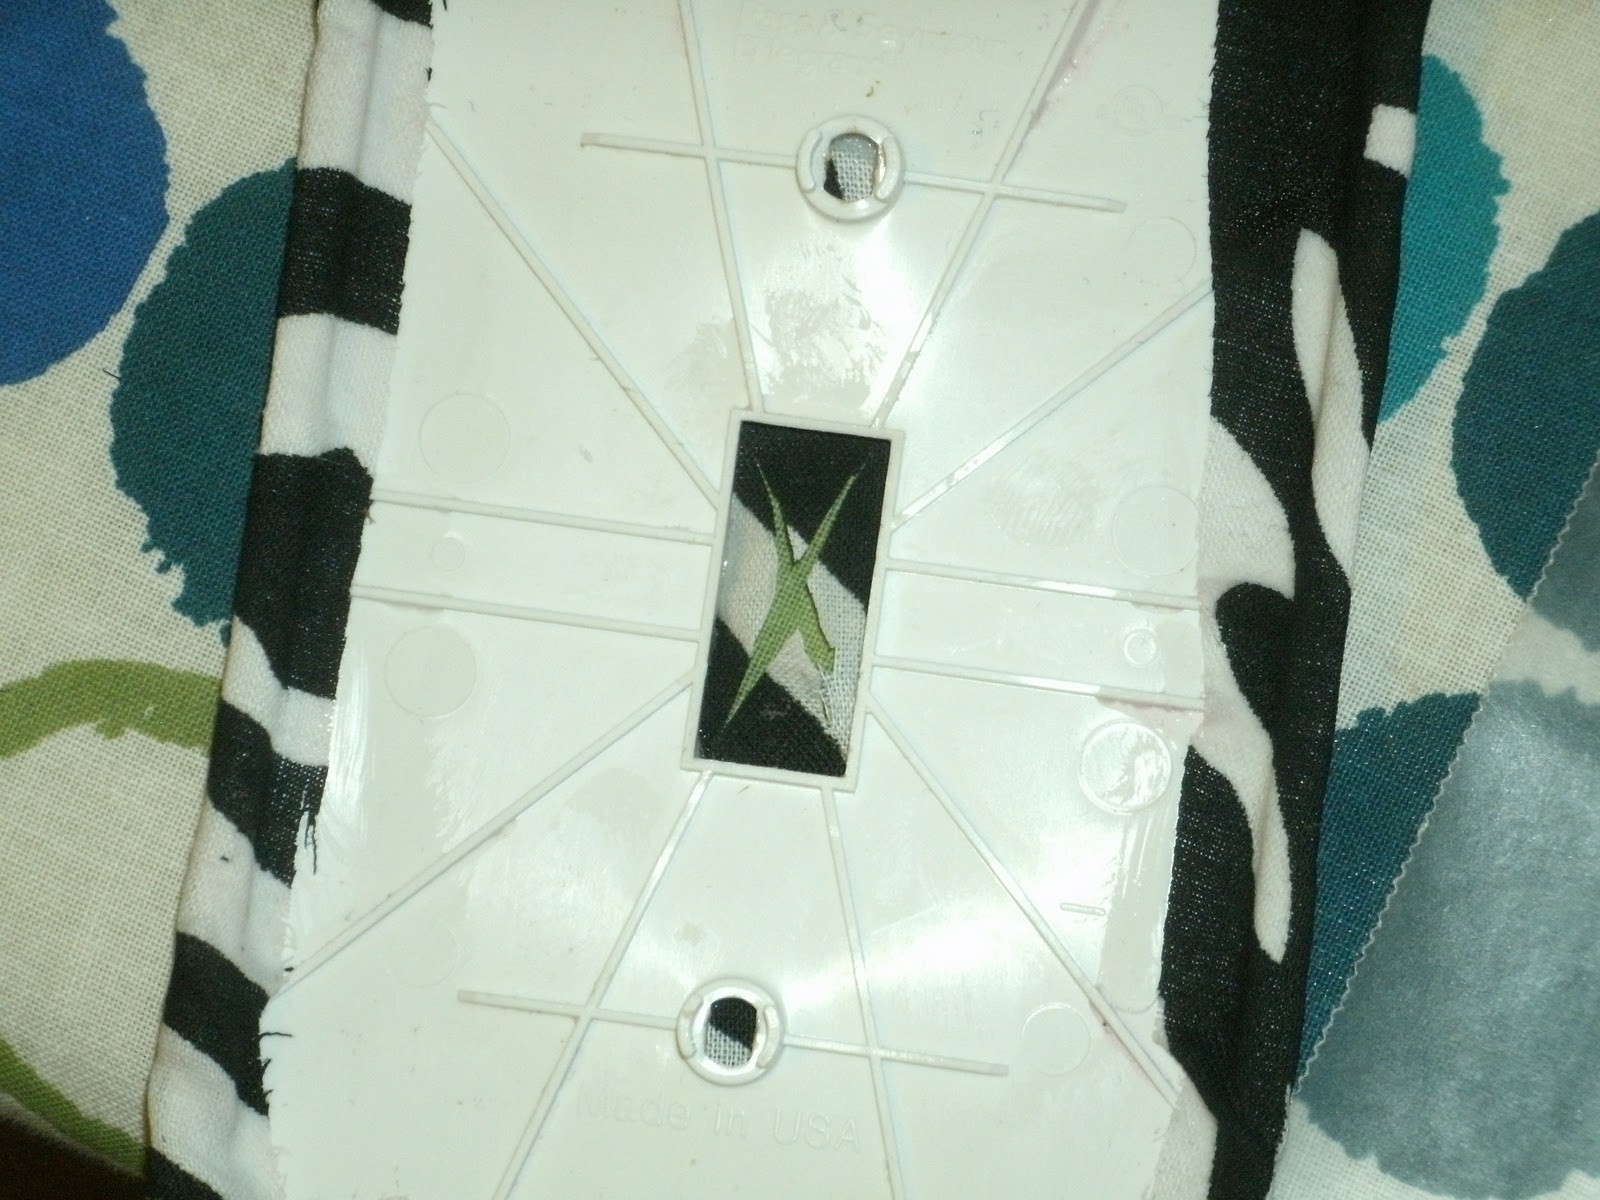
Forth, you will make an X cut where the switch goes through and then fold the fabric back and glue in the same way as you did on the edges. I use my tiny embroidery scissors to make this cut but you can also use a craft knife.

One its dry you will flip it over and puncture two holes where the screws go. You don't have to cut the entire tiny circle, if you just puncture it the screw does the rest when you install it.
Last step is to cover your switch plate with sealer. I used two coats,
you can use as many as you would like but I wouldn't recommend less than
two.

Ta Da! Instant pop of color to match any rooms decor.
FYI this can also be done using scrapbook paper following the same steps.
I hope you enjoyed it, have a great crafty weekend!!!
Sweet Tweet Baby Girl Quilt
Little birdies, how precious is this fabric? It's been sitting in my WIP pile for a while waiting for a back and finally got one! One down several more to go.

Machine appliqued birdie.

This one is currently available in my etsy shop

I couldn't get a good pic of the whole blanket, but you get the just. My favorite part is the little appliqued birdie on the corner. I hope you like it!
Thursday, January 26, 2012
Personalized Wall Art Tutorial
Since I can't sew anymore today I decided to be productive in other crafts. My sister in law is getting married and they are moving into their first place next month, she is doing her bathroom in zebra so I thought I would make her some things for her new house.

So here are the no-sew tutorials for this cute personalized piece of art.

First you will need
- your desired background fabric
- fabric for your applique
- design for your applique cut from paper or cardstock
- heat n bond
- iron
- scissors
- picture frame
- cardboard piece from inside picture frame or cut your own to size
First Step: iron your Heat N Bond to the back of your applique fabric (directions are on the package)

Second Step: Take your design template (mine is the letter V for their last name) and trace it onto your applique fabric. I just found a font I liked, enlarged it to the size I wanted, printed and cut it out.
Third Step: Cut our your design and peel off backing paper of Heat N Bond

Forth Step: Iron on your applique to your background fabric, be sure to flip the fabric over and iron the back to ensure a good application

Fifth Step: center your design on the cardboard piece, flip it over, wrap the edges around the back and hot glue them down

Now put it in the frame and hang it up

Ta Da!
Not My Day to Sew...
So I have been going through all my tons of fabric and found some cute dinosaurs I had bought a while back. I kept digging and found some cute coordinates to go with it to make a simple quick strip toddler quilt. I got to the third to last row on my quilt and look what happened...

Yep broke my sewing machine needle on my straight pin.... this is the first time I have broken one into three pieces. BLAH!!! So your saying just replace it... that was my last needle :( and we live in the country where the closest store is not close at all. So I will have to wait till tomorrow to go into town.
So here is my almost done toddler dino quilt.

Well I am off to find something else crafty to do!!!
Wednesday, January 25, 2012
Try a New Thing Wendsday
Well last night at almost midnight I found myself on this great webpage called Craftaholics Anonymous She has some of the best ideas on her page. I found this one simple headband tutorial and thought I would try it today since my daughter has fallen in love with headbands. So I did, I made five. There were so easy they only took like 30 minutes. All you need is two pieces of coordinating fabric 2X20" and a small piece of elastic. All the instructions can be found on her web page http://www.craftaholicsanonymous.net/
You should try to make some too!!!


Tuesday, January 24, 2012
Finished Quilts .... Sucess!!!
Yesterday I was able to finish up two quilts... it's a miracle! One was my favorite fabrics, Riley Blakes All Star 2 in blue, orange and brown. I had originally bought this to do my son's room in but at 16 months he has already developed a love for horses so we have switched to Wanna Be a Cowboy fabrics instead and that bedding is still in the WIP pile. However this All Star quilt was started last year... crazy life keeps me busy! So finally done and listed in my etsy shop.

My second finish was the beginning of my rummage through hundreds of yards of fabric in an attempt to deplete my massive supply. This is a cute little baby girl rag quilt with pinks, greens and brown dots, circles and flowers. I think it came out pretty cute. I am not one that is great at matching fabrics that didn't come grouped together to begin with. I always second guess myself if they will look good together, does anyone else do this???

This one is also available in my shop
Have a great Tuesday everybody!
Saturday, January 21, 2012
Easy as Pie Kindle Fire Cover
My nieces birthday is today and a little birdie told me she was saving up to get the new Kindle Fire. So instead of the boring old 'money in a card' I whipped up a cute cover she can use to keep her Kindle in and tucked some cash inside to go towards the purchase of her cool new tablet.

Lucky for me, my wonderful hubby had gotten me one for Christmas so I already had made a cover for mine and knew the dimensions.
So simple, all you need is:
- 8X19" piece of your outside fabric (I used a cotton print for mine and flannel hearts on hers)
- 8X19" batting (for a little added protection from bumps)
- 8X19" something soft (I used minky, you could use chenille, fleece, anything not scratchy)
- 2-3" long piece of sew on velcro .
Steps:
- Sew the 3 pieces right sides together, turn and flip right side out, stitch hole shut.
- Sew on your velcro at the each end of your rectangle. Scratchy at one end on the cotton side. Soft velcro at the opposite end of the rectangle on the minky side.
- Fold your rectangle leaving about 2-3" at the top for the flap and stich down each side
Easy As Pie
Friday, January 20, 2012
Throw size Rag Quilt wiht Joel Dewberry's Heirloom Collection
I fell in love with Joel Dewberry's Heirloom fabric collection the moment I saw it. So I just had to make something with it. This is my step by step of my new 'Texas Style' rag quilt. I am calling it a Texas style because it's just plain hot here and we don't have much need for big thick heavy blankets very often at all. For instance today is January 20th, it's snowing in a lot of the US today...here it's 75 degrees! So while most rag quilts have several layers of cotton, flannel and evening batting in some, this Texas version has two. It's very simple and comes out beautifully. Perfect to snuggle up with on the couch to fight that cold chill...from the air conditioner!

First I started out with 8 fat quarters from the collection. I got mine from www.sistersandquilters.etsy.com they have great prices and I always receive my fabric quickly!

From the 8 fat quarters I can get 72 six inch squares. You will also need to cut the same number of squares from your flannel material for the second layer.
(You also have the option to go with more than 2 layers on your rag quilt. You may want to have a coordinating print for the back. In that case you would sandwich the flannel between the to cotton layers with the prints facing outward on both sides. )
Once you have all your squares cut you will need to sew across each square to attach your layers together. I made a diagonal stitch from one corner to another just to tack the pieces together

Now you have all your squares ready to go. I prefer to layout my fabrics so I know for sure I won't have any doubles (the same fabric block next to each other). Once I know the order I am going to put the fabric in I can start sewing the squares together. My 72 squares layout in 9 rows of 8 squares.

To get the rag effect you will be sewing the squares with the backs together so your seam is on the front of your blanket. I sew each row first, laying the finished row back in it's place in my layout.

Now that all the rows are sewn you will need to sew each row together.

To do this you will want to line up your seams. Be sure to lay the seams opposite directions for easier sewing. I pin mine down to insure they lay right while the machine goes over them.
Once it's all sewn together run a seam around the outside edge of the entire blanket so you will be able to rag the outer edges as well.

Now the whole blanket is sewn together!!! For the final and most tedious step is to snip ALL the seams to create the ragged effect.

I try to snip about every half an inch. I used my sewing scissors (Gingher brand) but they do have scissors made for doing rag quilts that I am going to look into buying as your hand does start to ache half way through.
All done! I love it too. The final size comes out to about 41X45". If you are making this to sale or as a gift you may want to run it through the wash once to help the edges rag a bit more and it also gets read of all the stray strings.
I hope you enjoyed this tutorial check back often as I will be posting new quilts I make.
Wednesday, January 18, 2012
This is my first post!!! So exciting. I hope you all follow along with me down the path of my new found love for making quilts. I will be posting new quilts as I make them as well as wonderful ideas and links to great quilt patterns and fabrics. As I get more and more quilts under my belt I will have them for sale in my etsy shop found at www.liltxcutie.etsy.com
Subscribe to:
Comments (Atom)