My ETSY Shop has donated a gift certificate to a fellow blogger. You can check out her blog to enter!!!
Monday, February 20, 2012
Thursday, February 16, 2012
Finish It Up Friday (a little early)
It's been crazy busy around here, I haven't been able to post in over a week. But I have been able to sew since my new machine parts came in. I have orders galore, but I have finished the top to my new butterfly quilt. My inspiration I found here, but had the new Joel Dewberry Aviary fabric in lilac and wanted to do something in purples. I don't think there are enough purple things out there!
So here is the top of the quilt, waiting on a back, and I had some scraps left so I made a cute little throw pillow too!
My second finish actually got finished. It was inspired by one I saw on the Cluck Cluck Sew blog here. I have lots of scraps from my Joel Dewberry Heirloom quilt. So I used those as my leaves, I think it came out pretty!
Thanks for stopping by, hope yall have a great weekend!!!
Linked up with crazy mom quilts finish it up Friday
Labels:
aviary,
baby,
butterfly,
citrine,
crib,
heirloom,
joel dewberry,
lilac,
pillow,
purple,
quilt,
tree
Monday, February 6, 2012
WIP Pile... On Hold due to Mr. Naughty
Well the wedding was wonderful and the bride was beautiful! Now it's back to quilting...kinda! Below are two more I have in my work in progress pile... But progress has been haulted by a little 16 month old monster. That little monster came in my room and hid my presserfoot! AGAIN!!! Yep this is the second time he has made it disapear, and the second time work has been haulted waiting for the new one to come in the mail. Ahhhhh! Oh well, will have to work on other projects for now.
Above is my first shot at the tumbler quilt pattern. It's coming out pretty cute.
Below is that Mr. Naughty's new cowboy bedding... it's coming along too...
And one bad baby....
Happy Monday!!!
Tuesday, January 31, 2012
Two Cute Pillows
Still trying to get everything done by Saturday for my sister in laws wedding presents. I finally completed two cute pillows last night.
The fist one is a ruffle pillow, this is my first ruffle pillow I ever made and
I think it came out pretty cute.
What do you think?
The second is a small throw pillow for their bed (they are doing the master in leopard). I got this idea from Maureen Cracknell Handmade blog for a quilted heart pillow.
I hope she likes them!
Monday, January 30, 2012
Weekend Redo - Old Chair Becomes New
I have taken the first step towards getting my craft area together. I
have seen several posts of old chair finds from area Goodwill stores that have been redone so cute.
Then I got to thinking, ' I have some old chairs out in the top floor of
the barn' and what to you know they worked out perfect for a redo.
BEFORE
AFTER
I think it came out pretty darn cute and didn't cost me a dime since I already had the paint, chair and fabric. Hmmmm I have three more of these chairs in the barn, wonder who else needs a chair redone???
Next is the desk challenge. Yep there's a desk in the barn too, a big ugly bulky one that would be perfect for my sewing machine.
I am up for that challenge!!!
Happy Monday!!!!!
Friday, January 27, 2012
Fun to do Friday
If you read my last tutorial you know my sister in-law is getting
married and I was wanting to make some things that match their decor
they registered for their first place. The last tutorial was personalized wall art , today I am going to show you how to dress up a boring light switch cover to add a little pop to any room.
Supplies:
- switch plate
- fabric of your choice
- paint brush
- glue or mod podge
- sealer
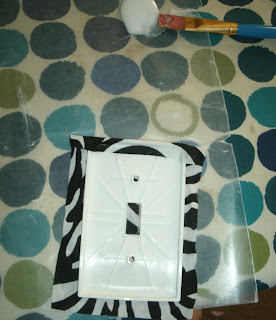
First you will spread the glue on the front of your switch plate and turn on over and press in the center of the wrong side of the fabric ( I am using a bandana and the print is on both sides)
Second you will brush glue along one side of the plate and fold your fabric over.
Continue this step for all four sides, applying more glue if needed to keep edges down.
Forth, you will make an X cut where the switch goes through and then fold the fabric back and glue in the same way as you did on the edges. I use my tiny embroidery scissors to make this cut but you can also use a craft knife.
One its dry you will flip it over and puncture two holes where the screws go. You don't have to cut the entire tiny circle, if you just puncture it the screw does the rest when you install it.
Last step is to cover your switch plate with sealer. I used two coats,
you can use as many as you would like but I wouldn't recommend less than
two.
Ta Da! Instant pop of color to match any rooms decor.
FYI this can also be done using scrapbook paper following the same steps.
I hope you enjoyed it, have a great crafty weekend!!!
Sweet Tweet Baby Girl Quilt
Little birdies, how precious is this fabric? It's been sitting in my WIP pile for a while waiting for a back and finally got one! One down several more to go.
Machine appliqued birdie.
This one is currently available in my etsy shop
I couldn't get a good pic of the whole blanket, but you get the just. My favorite part is the little appliqued birdie on the corner. I hope you like it!
Subscribe to:
Comments (Atom)


